PAPI lights are things most people have seen at airports but not realized just how cool they are. They’re mounted next to nearly every runway in the world, but they look like red lights to most people. From the pilot’s perspective, however, they’re an incredibly valuable tool to help them land.
What Are PAPI Lights?
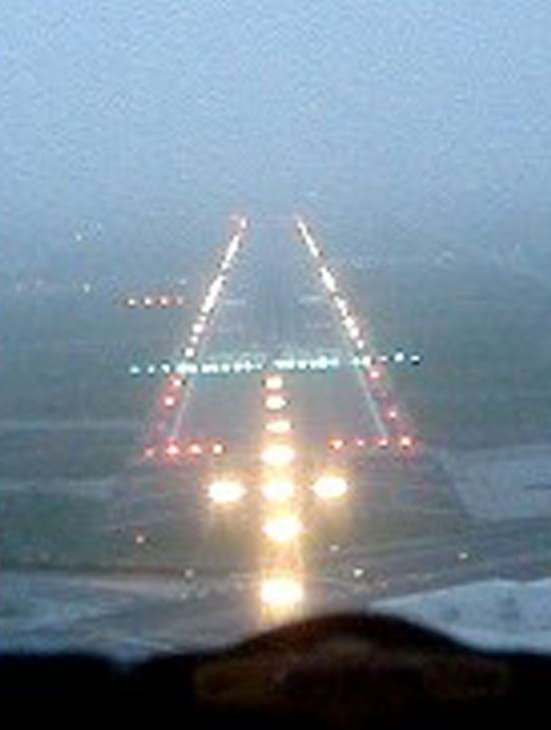
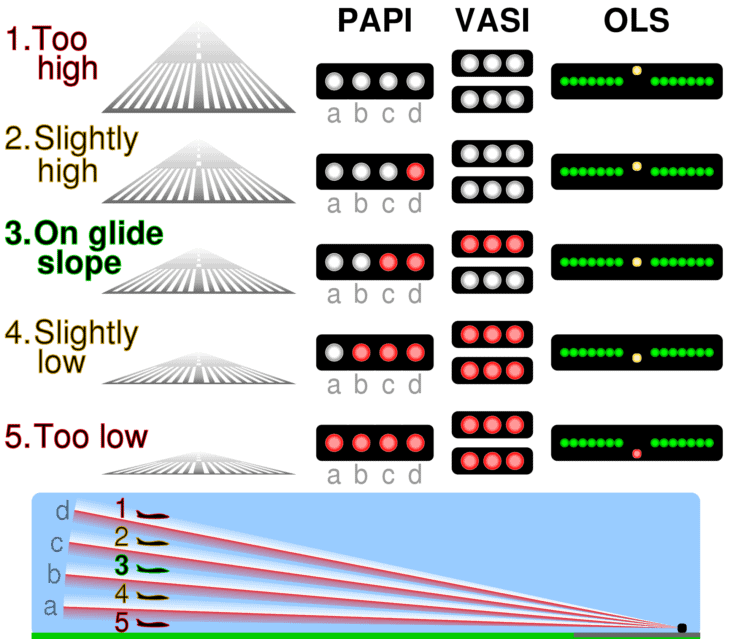
The PAPI lights appear to change color as the pilot approaches the runway. By getting the right color combination of two white and two red lights, the pilot can tell that they’re on the right path to the runway.
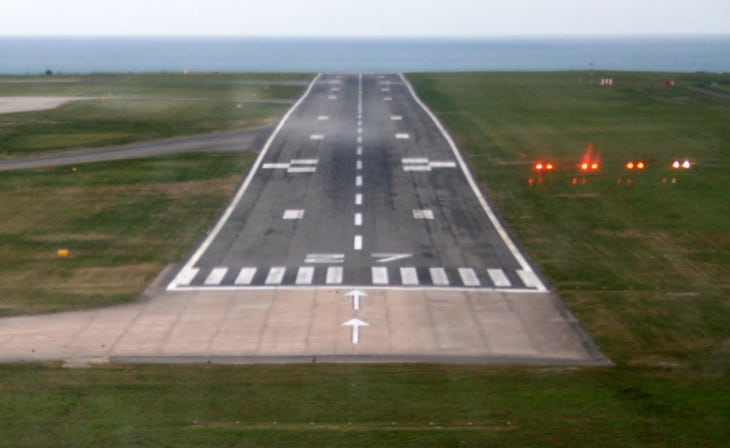
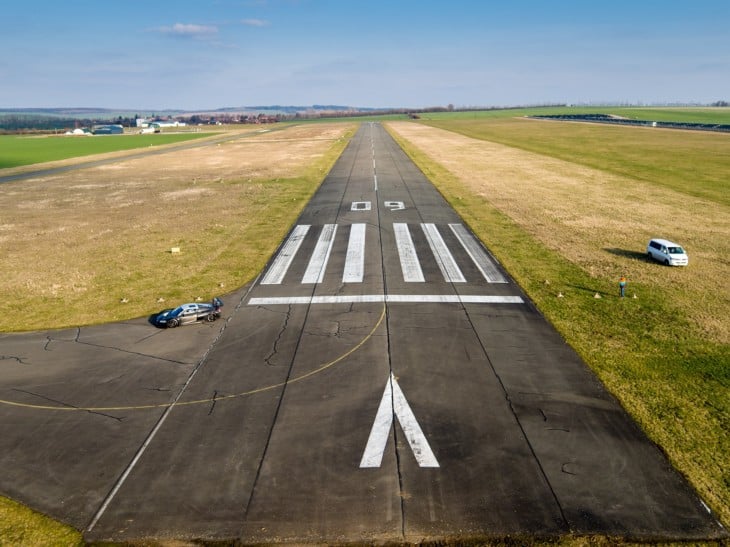
PAPI (pronounced “PAH-pee”) lights are a set of lights mounted next to the touchdown zone. The most common installation usually consists of four lights, each of which appears either red or white depending on the pilot’s point of view.
The lights are adjusted so that they indicate a three-degree glidepath to the runway. If the pilot is flying higher or lower, the lights give an immediate visual indication to take corrective action as soon as possible.
Sometimes a steeper glidepath to the runway may be required due to obstacles in the area. In these cases, the glidepath can be set to as much as four and a half degrees. The actual glidepath indicated by the PAPI lights can be found in the FAA digital Chart Supplements (d-CS).
Why are PAPI Lights Important?
Like driving on a highway, it’s pretty easy to get the airplane lined up on a runway. There are numerous visual references for determining if you are left or right of course. The very shape and direction of the runway is a pretty big clue.
But for determining if you are too high or too low, there are few clues. The clues that are there change from airport to airport. They even change with the weather. So how can a pilot know if they are too high or too low?
In good weather, pilots can use many visual clues to tell if they are approaching the runway at the right angle. Flying to a point on the runway is relatively simple. The pilot picks the point they want the airplane to fly over and aims for it. This aim point works out to be a little bit before where the plane will touch down. Most pilots use the runway number markings or the touchdown aim point markings.
But the visual aim point is a separate question from the angle of the descent. If the pilot approaches the runway at a very steep angle, they will have to make a very sharp transition from their approach to the nose-up landing attitude. That’s harder to do and may result in a hard landing.
If the pilot approaches at too shallow an angle, they risk hitting obstacles that lie in the runway’s approach path. The FAA and the airport authority ensure that this area’s objects aren’t too tall to pose a hazard to pilots. But there has to be a visual indication for pilots to know when they have gotten too low. Generally, airports ensure that pilots can fly a three-degree glidepath to the runway.
Runway Visual Illusions
The appearance of the runway ahead in the windscreen is one of the best clues a pilot has as to whether their approach path is on target or not. But unfortunately, the landing area’s visual appearance changes from airport to airport and day to day.
The width of the runway is a big tell for the pilot. If the width of a runway were always constant, they could plan their approaches based on it. Once they understood the relative size of the runway from 100 feet, 50 feet, 20 feet, and so on, they could fly their approaches based on that pretty easily.
But runways come in all various widths. Student pilots, who are just starting, often have trouble approaching runways at new airports. This difficulty is because they are used to the width of the runway at their home field.
If landing at an airport with a narrower runway, a pilot will have a dangerous tendency to approach the runway to low. On a wider runway, they will approach too high.
The slope of a runway also affects the visual picture that the pilot sees. An upsloping runway appears to get closer, so the pilot will feel like they are too high. A downsloping runway slopes away from the pilot, so they will correct by flying too low.
What’s the best solution for these problems at unfamiliar airports? These reasons are precisely why visual glidepath indicators are so helpful. In these, and nearly all other situations, the pilot can rely on the PAPI or VASI system to guide their approach. The standard glidepath that these systems show provides a benchmark from which they can base their approach to the runway.

How to Use PAPI Lights
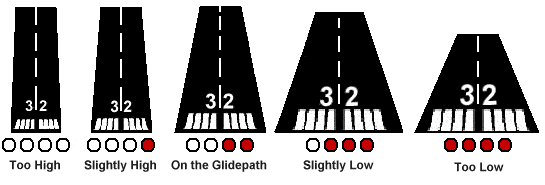
While on final approach, the pilot uses the PAPI much like the VASI system, but the PAPI provides slightly more information.
Each of the four lights of a PAPI is set to a different glidepath, meaning that the pilot gets a lot more information from them.
Four white lights–Too high
Three white lights, one red–Slightly high
Two white lights, two red–Perfect three-degree glidepath
One white light, three red–Slightly low
Four red lights–Too low
How does a pilot activate the PAPI lights? At most towered airports, the PAPI lights and their brightness is controlled by the air traffic controllers. At uncontrolled fields, the lights are left on 24/7. If the field has pilot controlled lighting after dark, then the PAPI lights are probably attached to that system and will come on with the rest of the runway lights.
Instrument Approaches with PAPI Lights
Many people are familiar with the ILS (instrument landing system), which provides the pilots guidance to the runway. It offers both a lateral left and right runway centerline as well as an electronic glide slope indication.
Flying an ILS is one of the only times there is an alternative to the visual PAPI system. Both the PAPI and the ILS glideslope should have the same glidepath.
But a majority of instrument approaches to runways are non-precision approaches, which means that they don’t have electronic glide slopes. For instrument pilots, who are often approaching strange runways in low visibility, the approach course guidance will get them aligned with the runway and nothing else.
They will descend to the minimum descent altitude (MDA), usually 400 to 600 feet above ground level. They’ll need to see the airport and runway environment to make a landing from this point on. Their primary tool will be–you guessed it–the PAPI.
How Do PAPI Lights Work?
PAPI lamp boxes usually contain one, two, or three lights. Each light has a bicolored lens assembly. The entire box is mounted on adjustable legs so that the angle can be set by the installer and adjusted by the airport ground crews.
When correctly set, each lightbox of the PAPI system points at a different approach angle. The individual PAPI light will change at its set angle by the pilot, so if the standard three-degree glidepath is desired, then the middle two PAPI lights would be set slightly more than three degrees and slightly less than three degrees.
Like nearly all other light applications, original incandescent light PAPIs are being replaced by LED technology. LEDs last longer, use considerably less power and put off less heat. While the installation cost may be slightly higher for an LED unit, the unit saves airports money in the long term.
Types of PAPI Lights
APAPI
An abbreviated PAPI light only has two lightboxes. This removes the slightly low and slightly high indications that a four-light PAPI provides.
For the pilot, an APAPI is functionally no different than a VASI. They both provide info on a glidepath and tell the pilot if they are too low or too high.
HAPI
Heliports also use PAPI systems, but they are referred to as helicopter approach path indicators (HAPI) to avoid confusion. Helicopters usually approach their landing areas much more steeply than airplanes do. Being able to approach a pad surrounded by terrain and obstacles is, after all, the advantage of a helicopter.
The standard approach path for helicopters is six degrees. To provide helo pilots with even more information in a smaller space, the HAPI has three colors, with green lights indicating the correct approach path. The HAPI usually consists of only two lights, since space on heliports is much more limited than airports.
Two white lights–Too high One white, one green light–Slightly high Two green lights–Perfect six-degree glidepath One green light, one red–Slightly low Two red lights–Too low
Other Types of Glidepath Indicators
VASI
Visual approach slope indicators (or VASI, pronounced “VAZ-ee”) are the previous generation of technology that PAPIs are replacing. Since they are not “precision,” they cannot provide the slightly low and slightly high indications.
VASIs consist of two light bars, one on top of the other. The correct glidepath is shown to the pilot by a red bar over a white bar. Too low is two red bars, while too high is two white bars.
There are also a few other VASI versions out there, including a pulsating light VASI and a tricolor VASI. Neither system is widespread, and they serve the same essential function.
Related Posts
- Suvarnabhumi Airport: A Comprehensive Guide for Travelers
- Lukla Airport: The Gateway to Everest Trekking
- Tokyo Haneda Airport vs. Narita Airport: Which Is Right for You?
About the Author


